Snowflake
Use this guide to configure Snowflake as a storage in OWOX Data Marts. The steps below walk you through creating a storage record, completing authentication, and finishing validation.
Before you begin
Section titled “Before you begin”Ensure you have a Snowflake account with the right permissions and access. To set up Snowflake storage in OWOX Data Marts, your account should:
- Have write access to the warehouse and database where OWOX Data Marts will store data.
- Be assigned roles and permissions that allow you to create or use warehouses, schemas, and tables (detailed steps are provided below).
- Follow your organization’s security policies for account access and management.
If you’re unsure about your permissions, contact your Snowflake administrator before proceeding.
☝️ Use a dedicated service account (e.g.,
OWOX_SERVICE_USER) for the OWOX Data Marts integration. This improves security by isolating the integration’s access, ensures stability when employees change roles, and simplifies auditing activity in Snowflake logs.You can use a personal account if policies allow, but it’s not recommended for production.
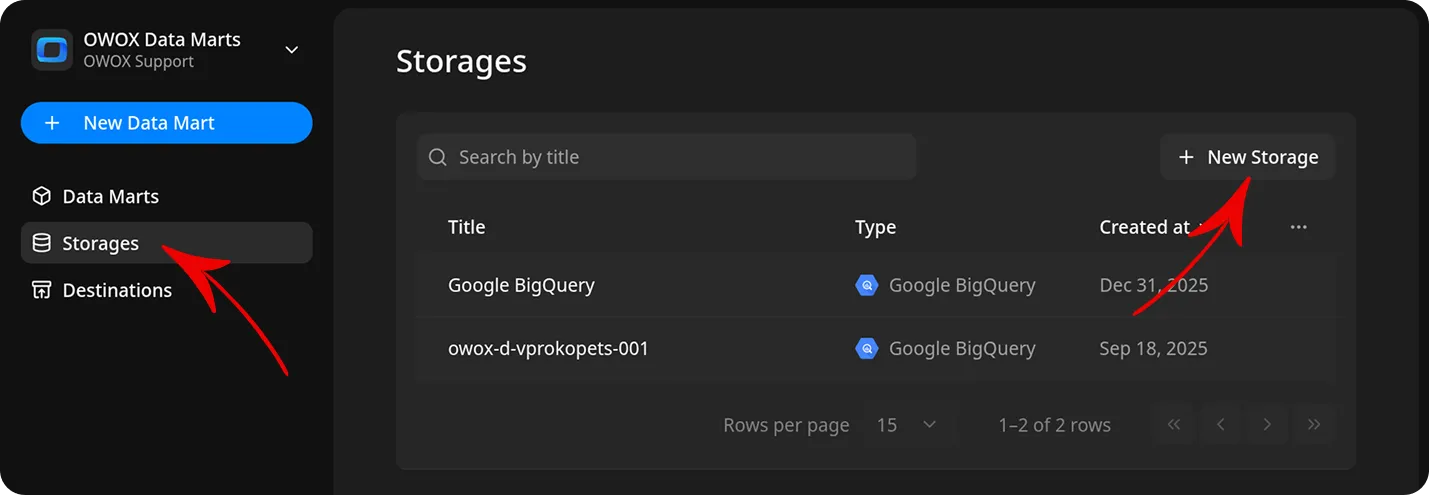
1. Set up Snowflake Storage
Section titled “1. Set up Snowflake Storage”In OWOX Data Marts, open Storages from the main navigation pane, and click + New Storage. Select Snowflake. Give the storage a clear title (e.g., Snowflake Production).
Note: The storage record is created immediately, but a Data Mart cannot be validated or published until the storage is fully configured.
2. Set Up Authentication
Section titled “2. Set Up Authentication”Before you can configure the storage, you must provide valid authentication details. Without proper authentication, the setup cannot proceed. In this section, we’ll guide you through gathering and entering the required credentials for Snowflake.
Note: The authentication fields are located in the lower section of the storage configuration form. Be sure to scroll down to find and complete these fields.
Connection settings will be covered in the next steps.
Choose Authentication Method
Section titled “Choose Authentication Method”Snowflake supports two authentication methods:
Key Pair Authentication is recommended for most environments, as it offers enhanced security. However, you can choose the method that best fits your needs. Follow the steps below to gather the required information and complete authentication successfully.
Option 1: Username + Programmatic Access Token (PAT)
Section titled “Option 1: Username + Programmatic Access Token (PAT)”- Username: Login for your Snowflake user or service account
- Programmatic Access Token (PAT): A secure token used instead of a password for programmatic access
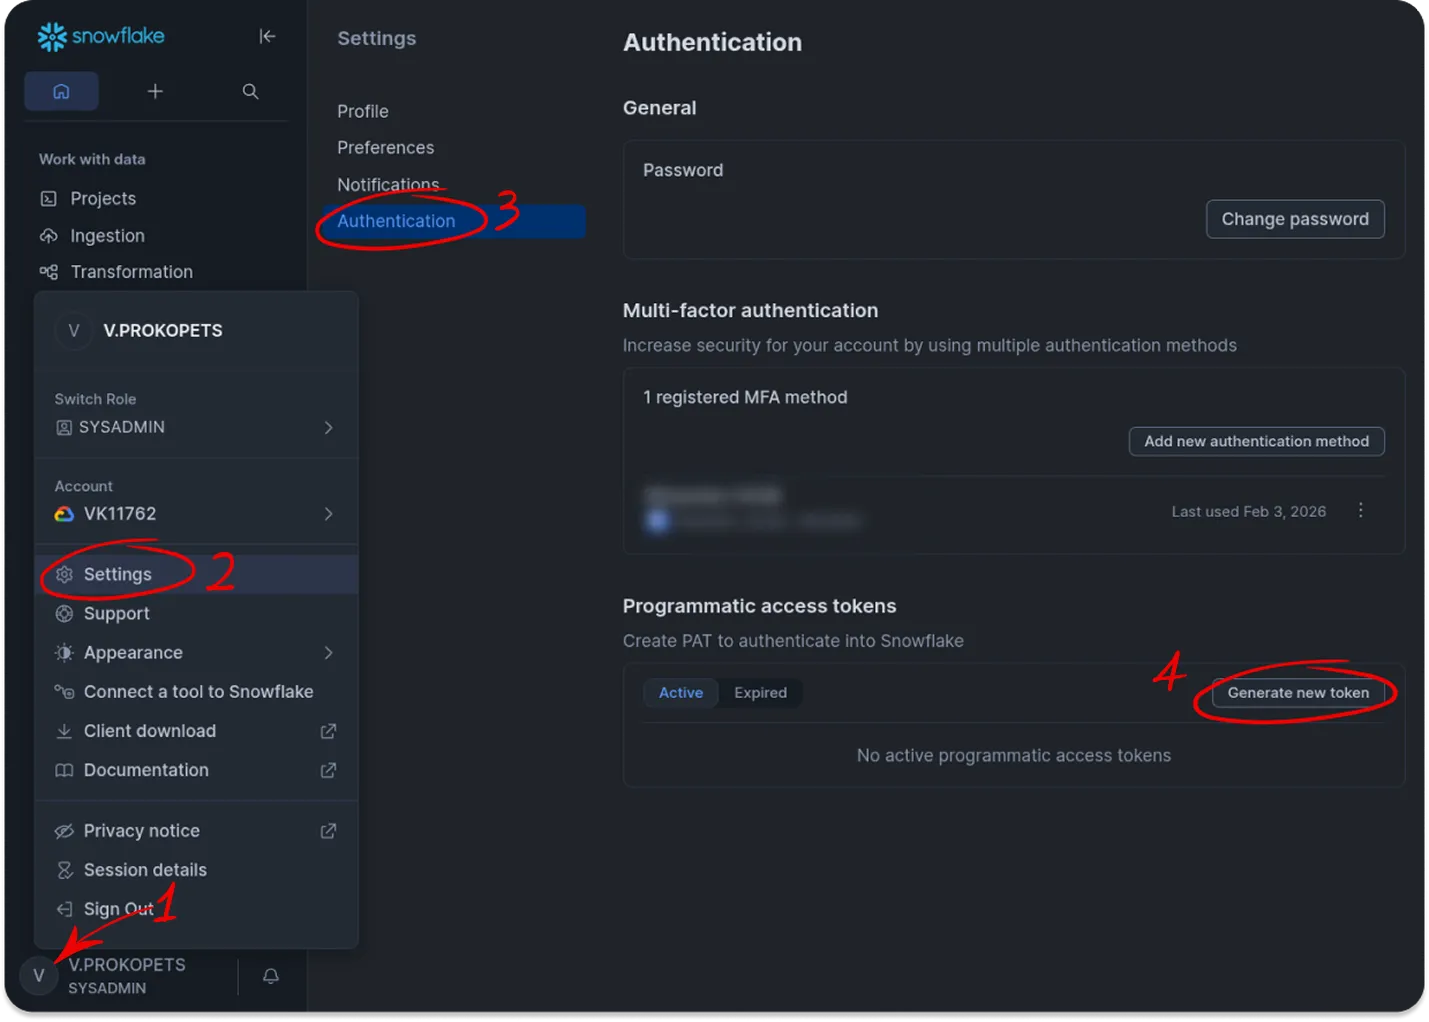
Step 1. Generate a Programmatic Access Token (PAT)
Section titled “Step 1. Generate a Programmatic Access Token (PAT)”- Log in to your Snowflake account, ensuring you’re using the dedicated user or service account intended for the OWOX Data Marts integration.
- From the user menu, go to Settings → Authentication.
- Scroll to Programmatic access tokens and click Generate new token.
- Enter a Token name (e.g.,
OWOX_TOKEN) and choose an expiration (up to 1 year by default). - Click Generate.
⚠️ Important
Copy the token immediately or download it and store it securely (for example, in a password manager).
You will not be able to view the token again after closing the dialog.
Step 2. Configure Network Policy (Admin Action Required)
Section titled “Step 2. Configure Network Policy (Admin Action Required)”By default, Snowflake requires PAT users to be covered by a network policy. A Snowflake account administrator must allow connections from trusted IP addresses. For example:
CREATE NETWORK POLICY <policy_name>  ALLOWED_IP_LIST = ('34.38.103.182');
ALTER USER <your_user>  SET NETWORK_POLICY = <policy_name>;
Replace:
<policy_name>with a descriptive name (for example,owox_network_policy)<your_user>with the dedicated account login name (e.g.,OWOX_SERVICE_USER)
The external IP address 34.38.103.182 is the official and permanent address used by OWOX Data Marts to connect to your Snowflake account. You can safely use this exact IP in your network policy configuration. Do not modify or replace it with a different address.
⚠️ Important: Once the network policy is applied, PAT-based access is restricted to the allowed IPs only. Connections from unlisted IPs (including your workstation) will be blocked. If you use a personal account and need direct access, ask your admin to add your IP to the policy.
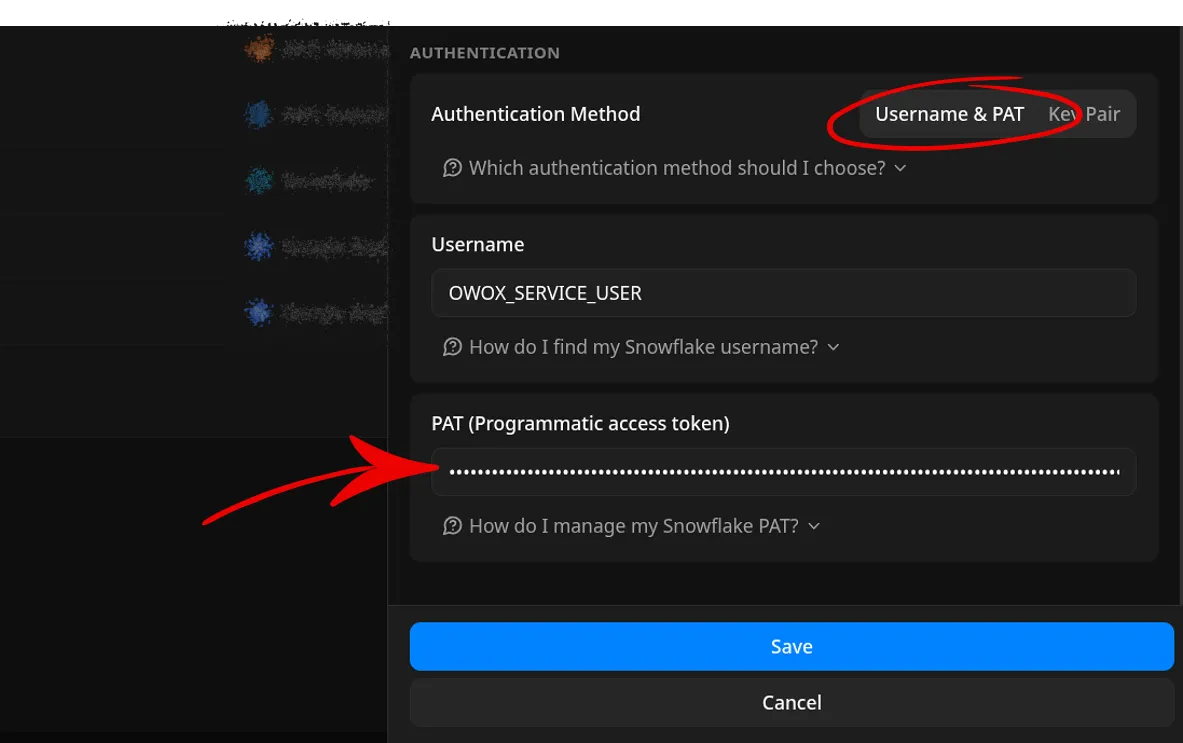
Step 3. Configure PAT Authentication in OWOX Data Marts
Section titled “Step 3. Configure PAT Authentication in OWOX Data Marts”Once the network policy is active:
- Return to the OWOX Data Marts interface and verify you are on the new storage configuration screen.
- Select Username & PAT as the authentication method.
- Enter the required credentials:
- In the Username field, enter the Snowflake login name for your dedicated user (e.g.,
OWOX_SERVICE_USER). - In the Personal Access Token field, paste the PAT you generated in Step 1.
- In the Username field, enter the Snowflake login name for your dedicated user (e.g.,
- Go to the Set General Settings and Connection Details section.
Option 2: Key Pair Authentication
Section titled “Option 2: Key Pair Authentication”Key pair authentication provides enhanced security and is the recommended approach for setting up Snowflake as a storage.
Step 1. Generate a private key
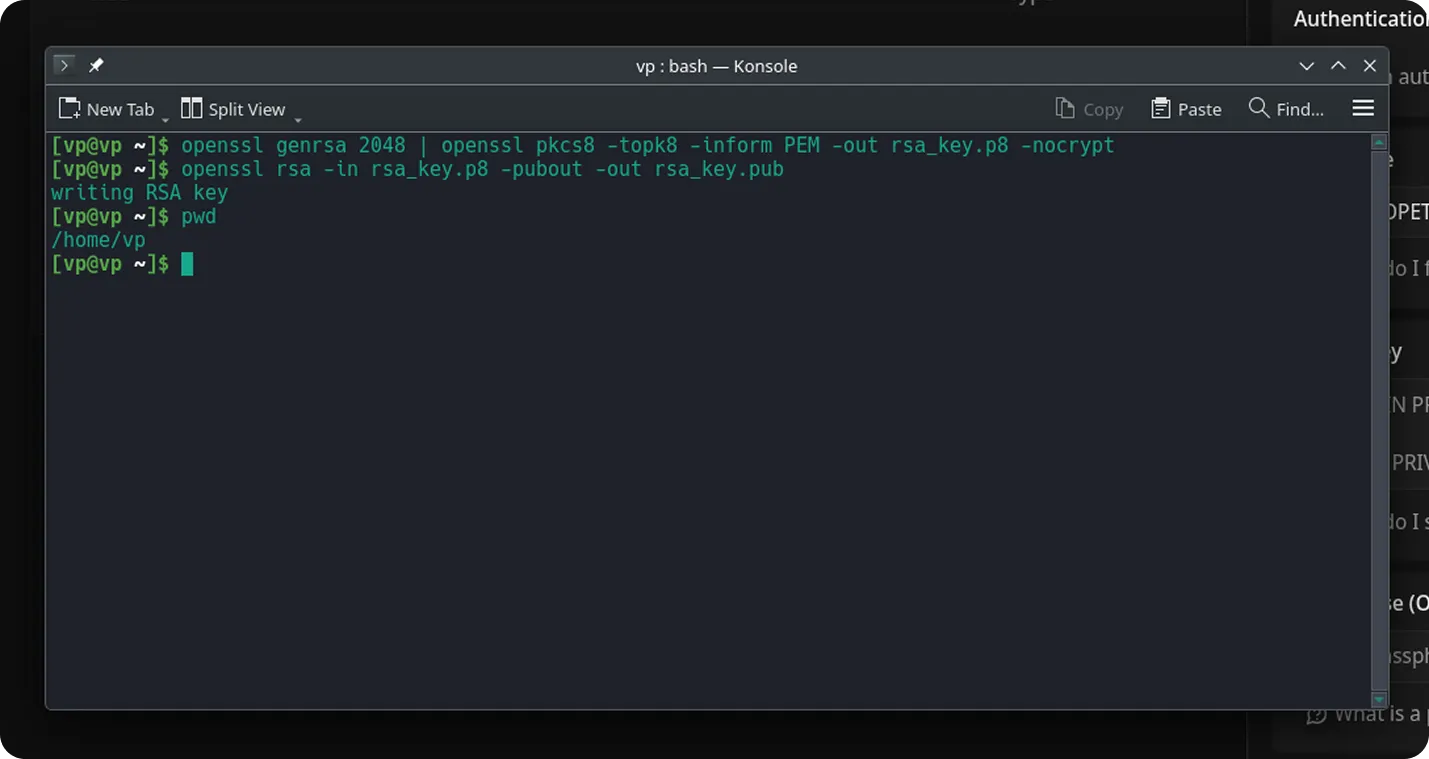
Section titled “Step 1. Generate a private key”Run the following command in a terminal on your local machine:
openssl genrsa 2048 | openssl pkcs8 -topk8 -inform PEM -out rsa_key.p8 -nocryptIf you prefer to protect the key with a passphrase, omit the
-nocryptflag.
Step 2. Generate a public key
Section titled “Step 2. Generate a public key”openssl rsa -in rsa_key.p8 -pubout -out rsa_key.pub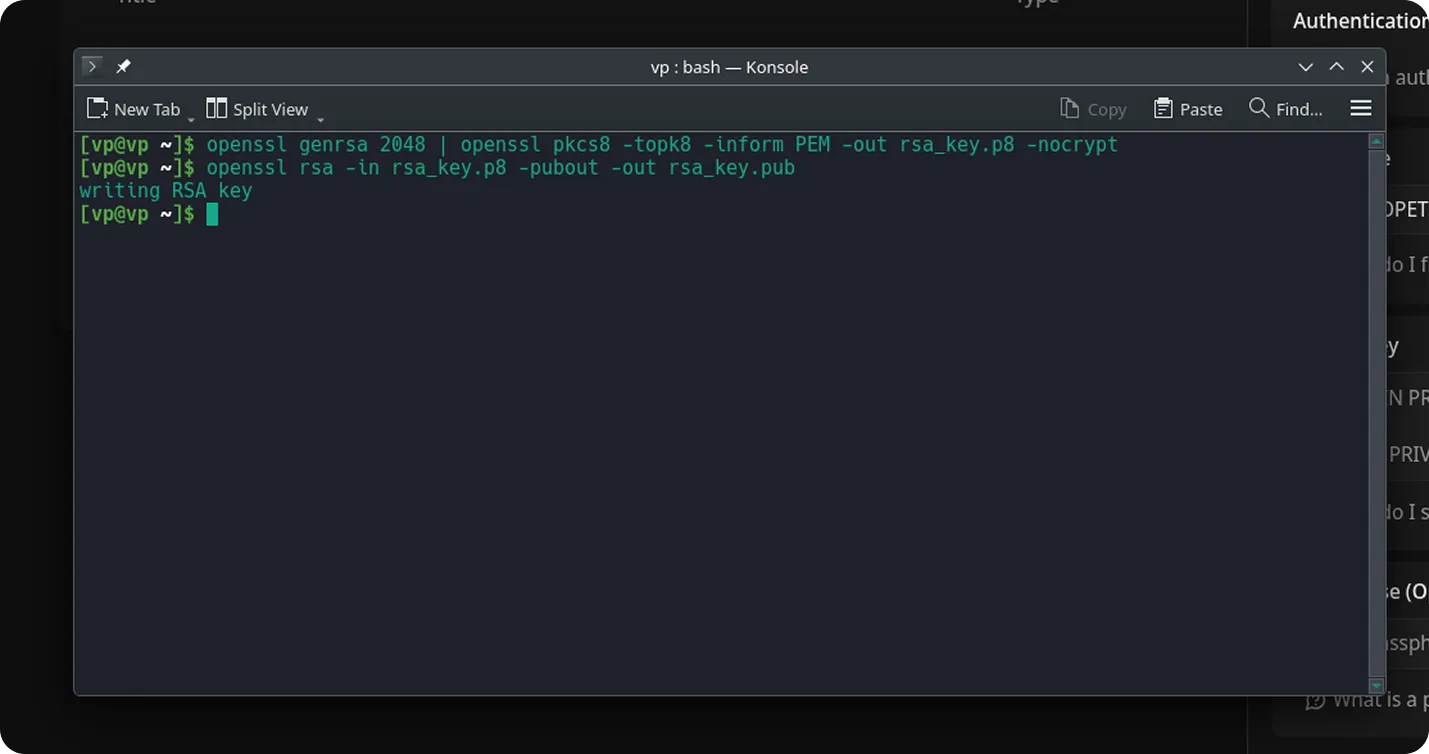
Open the rsa_key.pub file in any text editor (for example, VS Code or Sublime Text) and copy its contents. If you are not sure where it was saved, check your current directory: run pwd on macOS/Linux, or use echo %cd% (or cd) in Command Prompt on Windows.
Step 3. Assign the public key to your Snowflake user
Section titled “Step 3. Assign the public key to your Snowflake user”Log in to the Snowflake interface using the dedicated user account you are configuring for the storage. Run the following SQL command to assign the public key to your user:
ALTER USER "<your_username>" SET RSA_PUBLIC_KEY='<your_public_key>';Replace the placeholders:
<your_username>: The Snowflake login name for your dedicated user (e.g.,OWOX_SERVICE_USER).<your_public_key>: The full public key string copied from yourrsa_key.pubfile.
This step enables key pair authentication for your user account.
Important formatting rules:
-
Remove the lines:
-----BEGIN PUBLIC KEY----------END PUBLIC KEY----- -
Concatenate the remaining lines into one continuous string
-
Do not include line breaks or spaces

If you encounter the error
SQL access control error: Insufficient privileges to operate on user '<your_username>'., it means your Snowflake user does not have the necessary permissions.
Please ask your Snowflake administrator to run the required command or grant you the appropriate privileges.
Step 4. Configure Key Pair Authentication in OWOX Data Marts
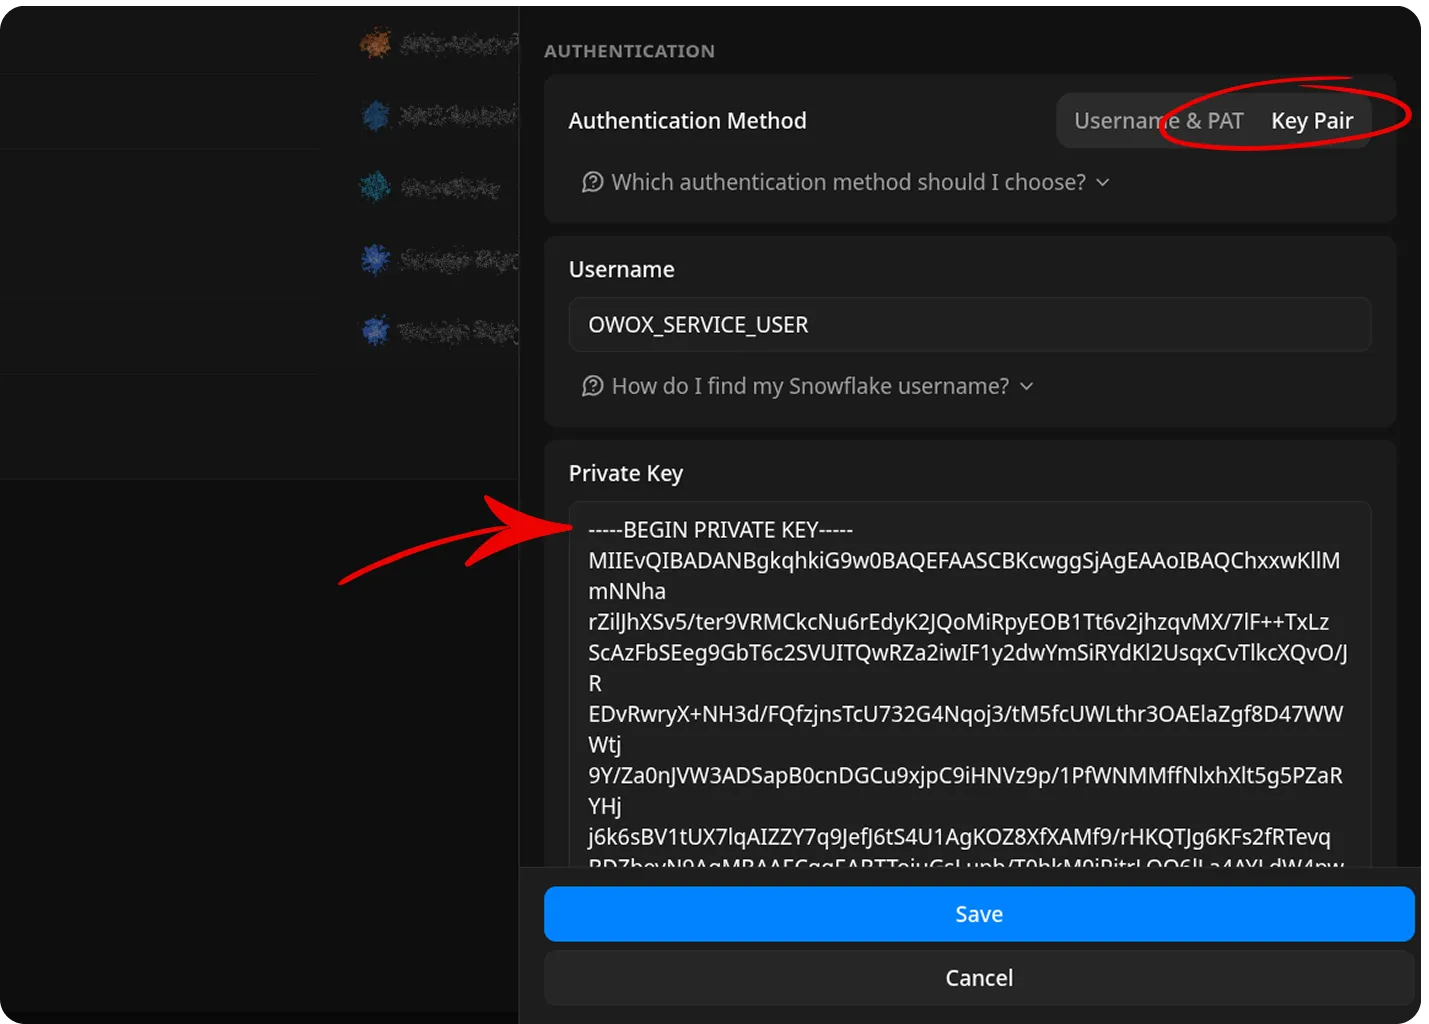
Section titled “Step 4. Configure Key Pair Authentication in OWOX Data Marts”-
Choose Key Pair as the authentication method.
-
Open the
rsa_key.p8file in any text editor (for example, VS Code or Sublime Text). -
Copy the entire contents, including:
-----BEGIN PRIVATE KEY-----...-----END PRIVATE KEY-----Tip: For key pair authentication, you must use your private key from the
.p8file (not the.pubfile).
Open thersa_key.p8file you generated earlier and copy its entire contents including the header and footer lines for this step. -
Enter the required credentials:
- In the Private Key field, paste the private key.
- In the Username field, enter the Snowflake login name for your dedicated user (e.g.,
OWOX_SERVICE_USER).
(Optional) Private Key Passphrase:
- If your private key was created with encryption, enter the passphrase.
- If you used the
-nocryptoption, leave this field empty.
🔒 Security note
Never share your private key outside the organization.
Store it securely (for example, in a password manager or secret vault).
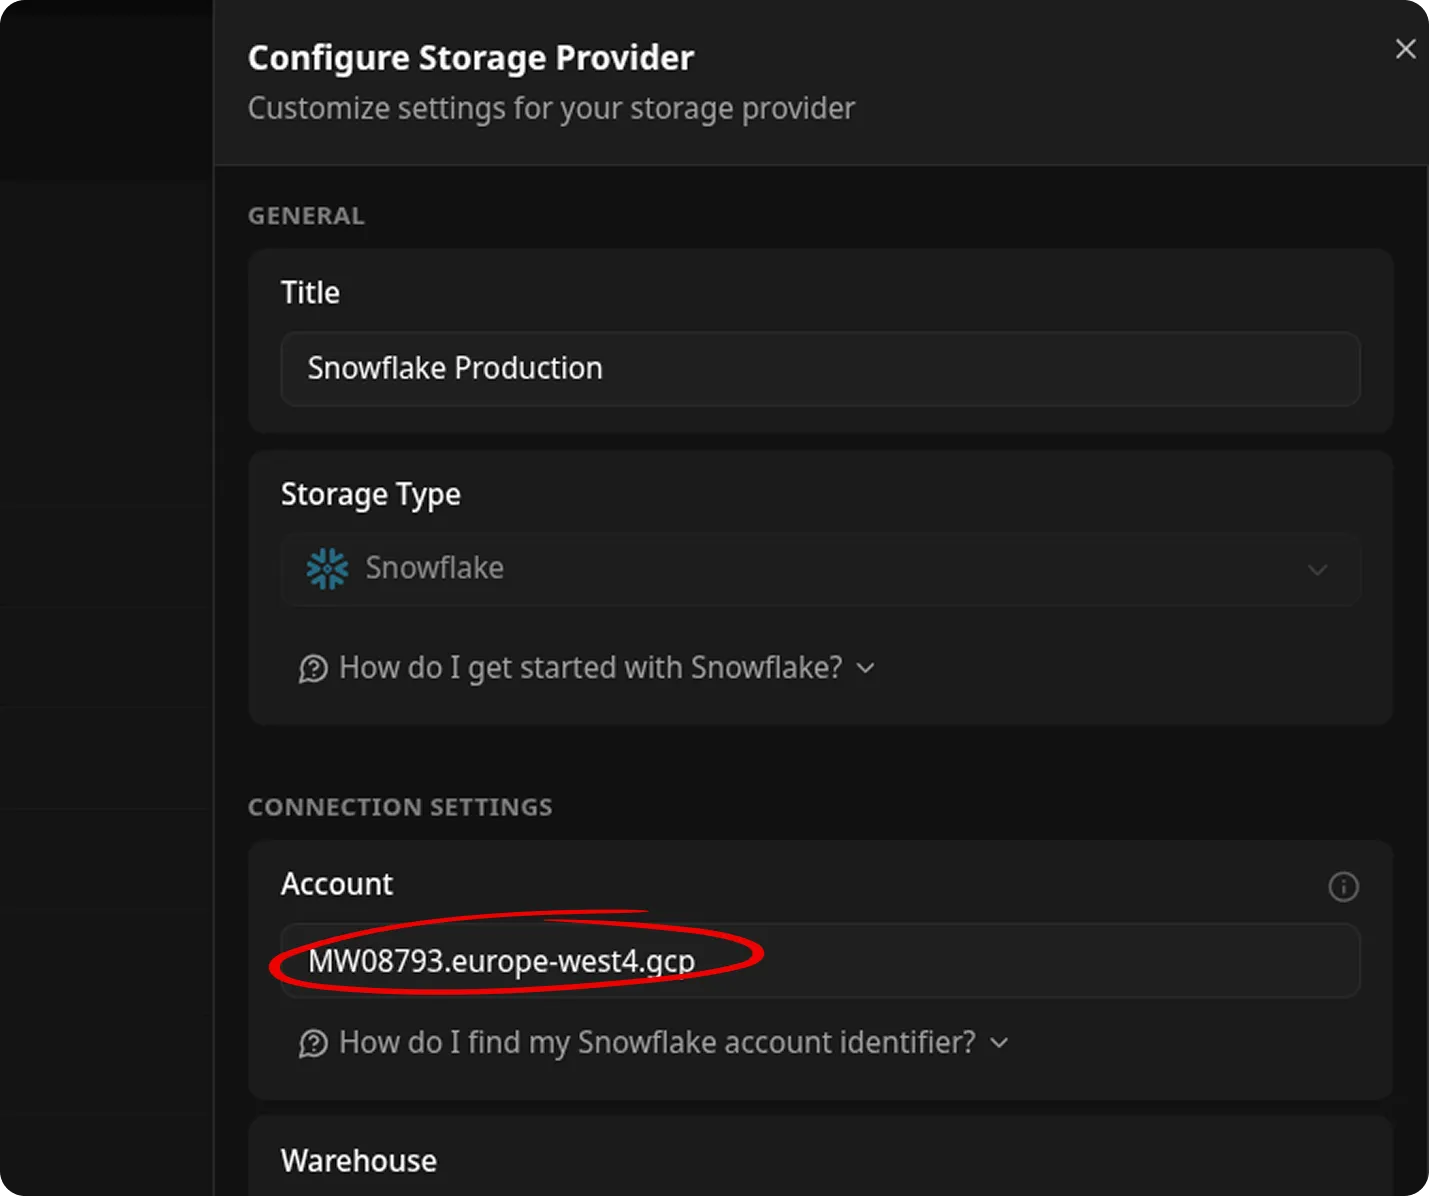
3. Set General Settings and Connection Details
Section titled “3. Set General Settings and Connection Details”Enter Account Identifier
Section titled “Enter Account Identifier”-
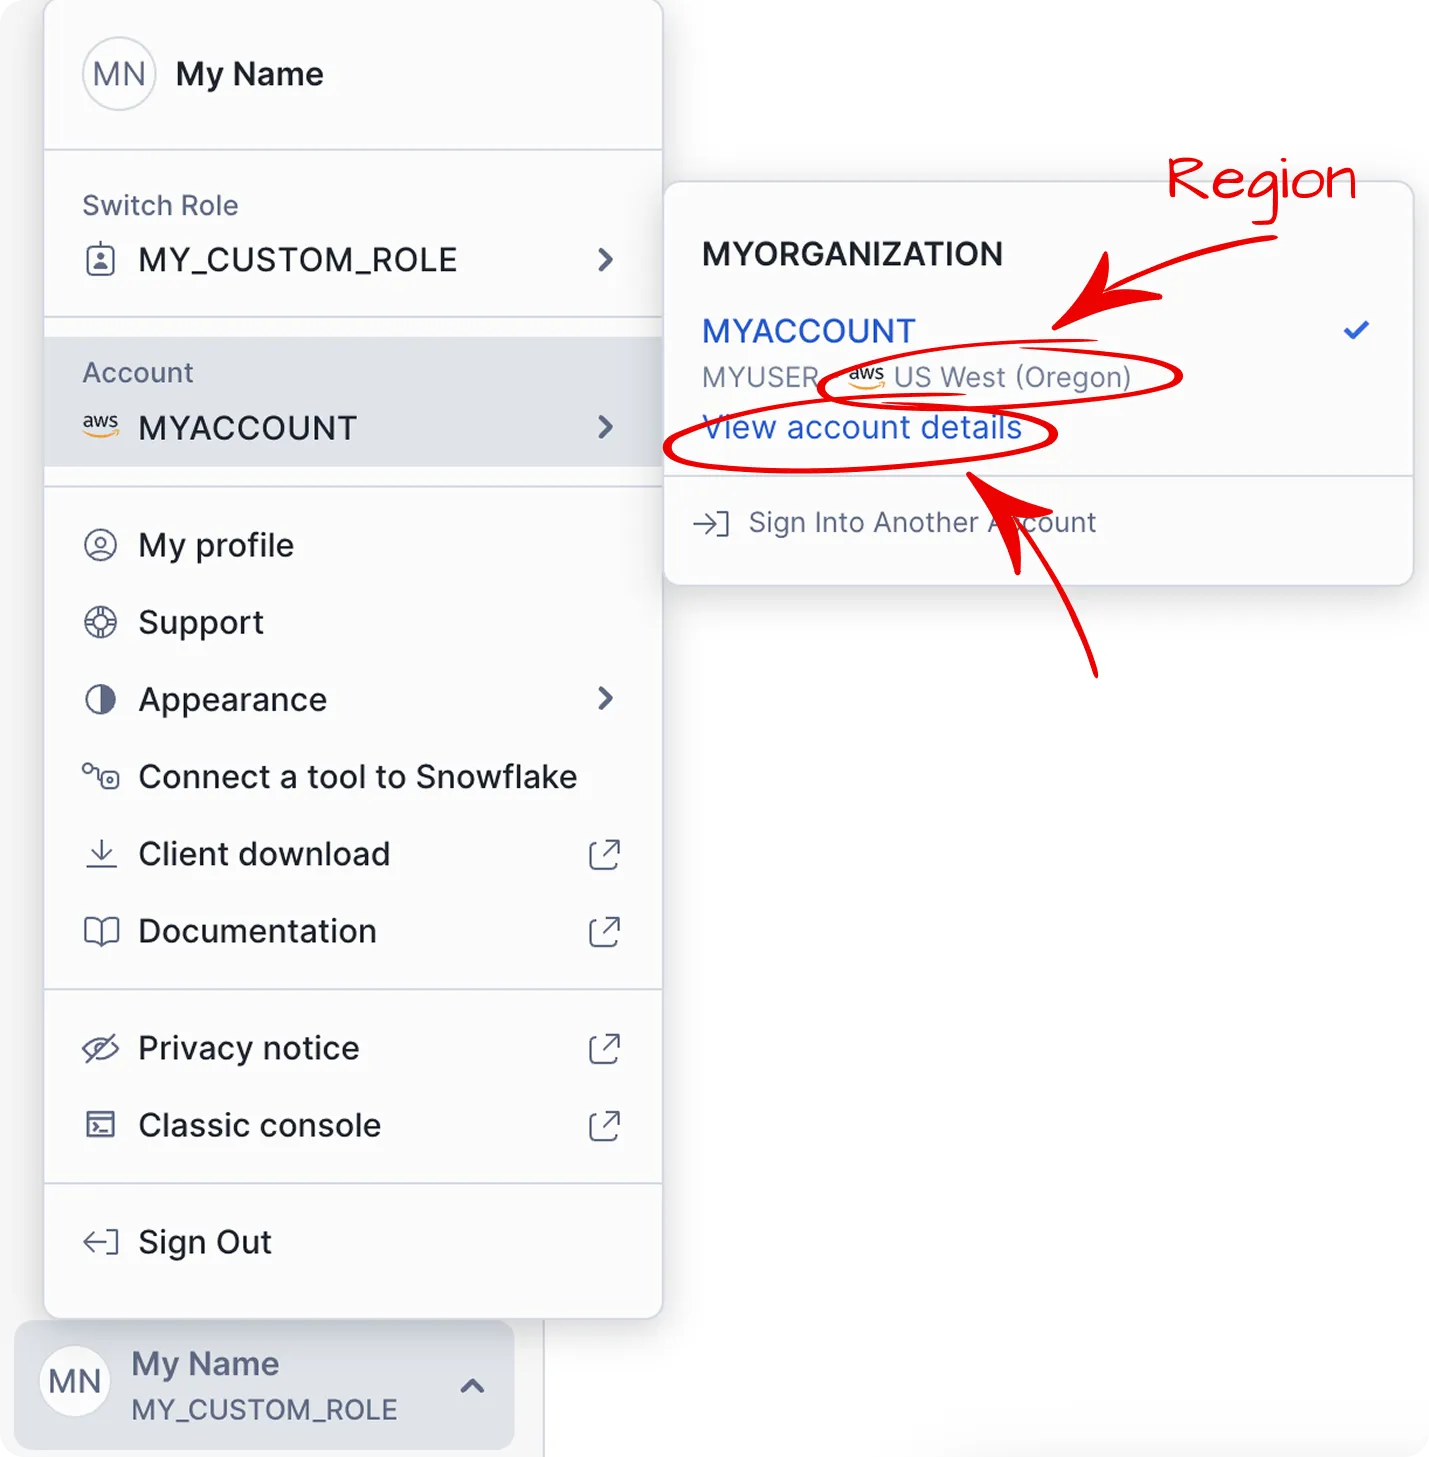
In Snowflake, open the account selector and find your dedicated account.
-
In the account selector, look for the region displayed next to your account name (for example, US West (Oregon)). This region information is essential for constructing your account identifier.
Tip: The account identifier format varies depending on your Snowflake account’s cloud provider (AWS, Azure, or Google Cloud) and region. Always consult the documentation to ensure you use the correct format.
- Make a note of this region, as it determines the format of your account identifier.
- To find the correct format for your cloud provider and region, refer to the official Snowflake documentation:
Account Identifier formats by cloud and region.
-
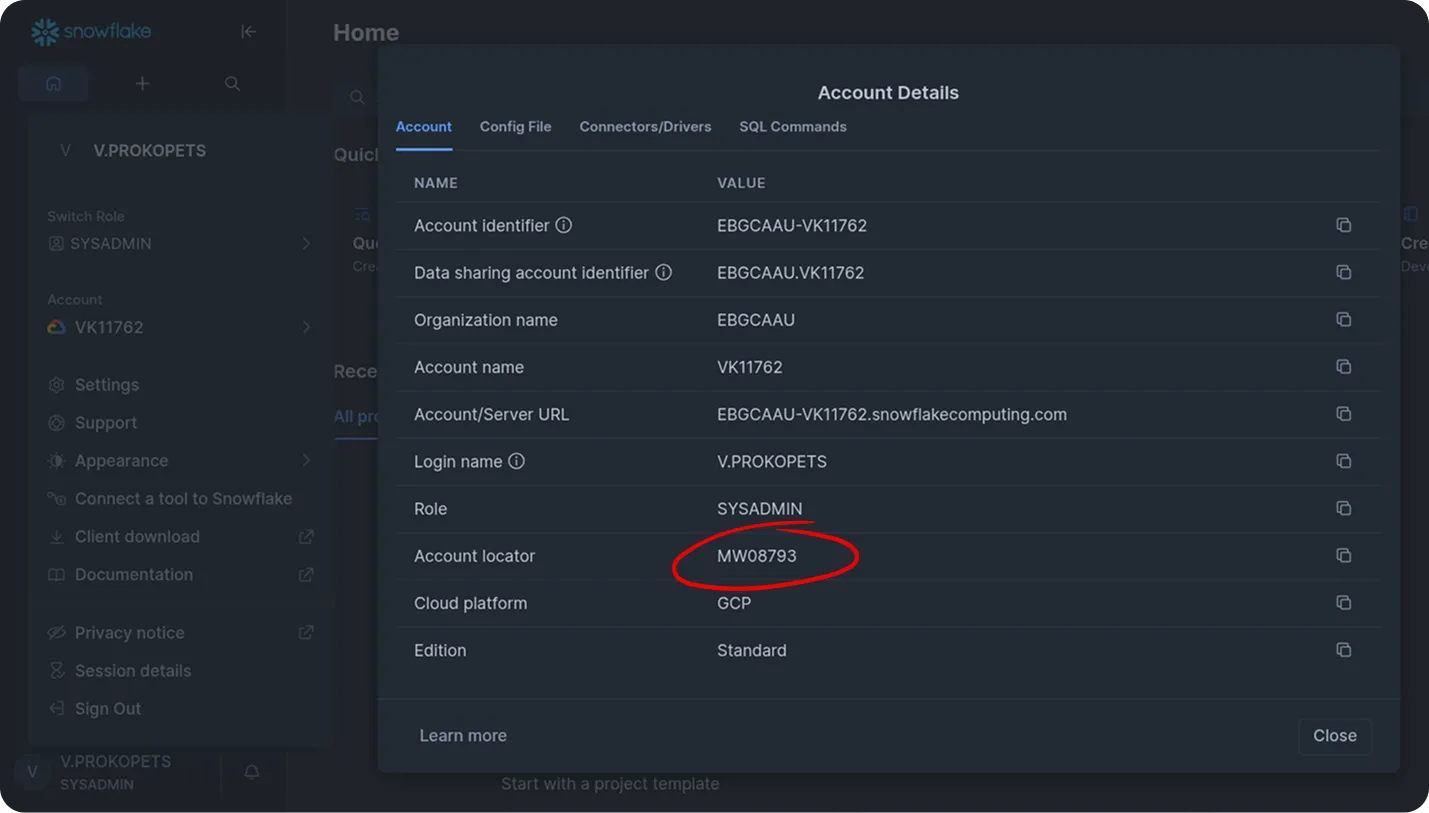
Click View account details.
-
In Account Details, copy the value from Account locator.
Tip: To check your account locator directly, run this SQL in Snowflake:
SELECT CURRENT_ACCOUNT(); -
Construct your account identifier in the format:
<account_locator>.<region>Note:
If your account is in AWS US West (Oregon), the identifier may be just the locator (e.g.,xy12345), without a region suffix.Examples:
xy12345.ap-northeast-3.awsxy12345.north-europe.azure
Enter Warehouse Name
Section titled “Enter Warehouse Name”- In Snowflake, go to Compute → Warehouses
- Use an existing warehouse or create a new one
- Copy the warehouse name (e.g.,
OWOX_DATA_MARTS)
Best Practice: Use a dedicated warehouse for OWOX Data Marts to better control costs and performance.
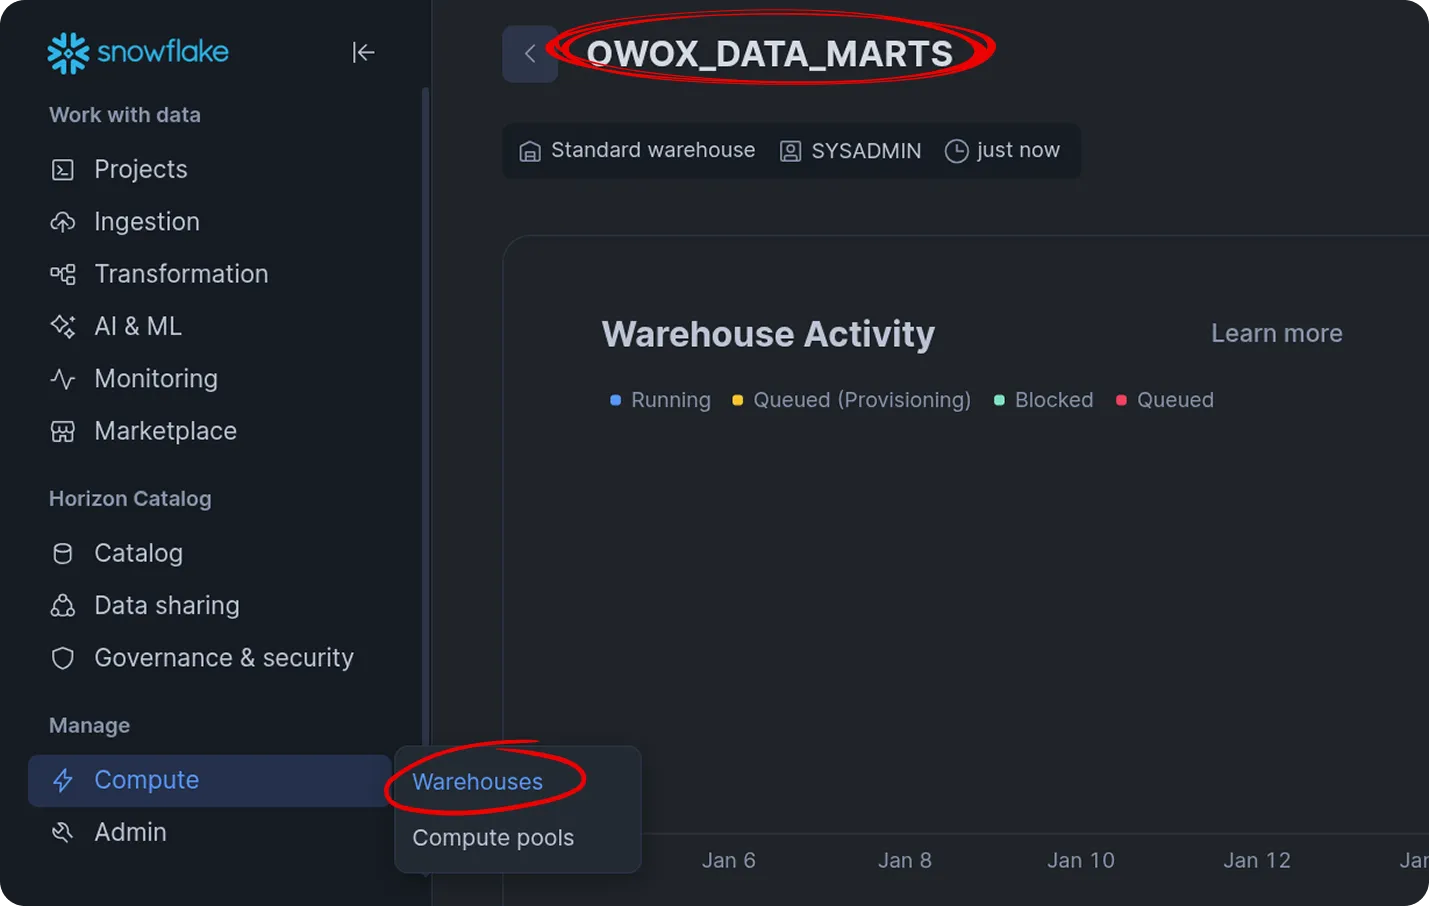
Enter the warehouse name in the storage form (use the exact name).
4. Finalize Setup
Section titled “4. Finalize Setup”- Review all entered values.
- Click Save to add the Snowflake storage configuration.
OWOX Data Marts will automatically validate the connection.
Next Steps
Section titled “Next Steps”After the Snowflake storage is configured:
- Create a Data Mart that uses this storage.
- Configure a Connector to load data into Snowflake.
- Run reports and work with data in your Snowflake tables.
Troubleshooting
Section titled “Troubleshooting”❌ Network policy error in the OWOX Data Marts interface
Section titled “❌ Network policy error in the OWOX Data Marts interface”Access validation failed. Snowflake access error:Failed to connect to Snowflake: Network policy is required.Cause:
A Snowflake administrator has not applied a required network policy to dedicated user.
Solution:
Return to Step 2: Configure Network Policy (Admin Action Required) and ask an admin to apply the policy.
After that, try adding the storage once more.
❌ MFA authentication error in the OWOX Data Marts interface
Section titled “❌ MFA authentication error in the OWOX Data Marts interface”Access validation failed. Snowflake access error:Failed to authenticate: MFA authentication is required,but none of your current MFA methods are supportedfor programmatic authentication.Cause:
You entered a password instead of a PAT (for Option 1) or used the wrong authentication method.
Solution:
For Username + PAT authentication: generate a PAT and use it instead of a password.
For Key Pair authentication: ensure you selected Key Pair and pasted the private key from rsa_key.p8.
❌ Insufficient privileges error in the Snowflake interface
Section titled “❌ Insufficient privileges error in the Snowflake interface”SQL access control error: Insufficient privileges to operate on user '<your_user>'.Cause:
Your Snowflake user does not have the required permissions to run the query.
Solution:
Ask your Snowflake administrator to run the command for you or grant the necessary privileges.
Once the admin has completed this step, try adding the storage again.
❌ Incoming request error in the Snowflake interface
Section titled “❌ Incoming request error in the Snowflake interface”Incoming request with IP/Token 00.00.000.000 is not allowed to access Snowflake.Contact your account administrator. For more information about this error, click here.Cause:
Your network policy does not include the IP address from which you are trying to access Snowflake. By default, the policy may only allow connections from the official OWOX Data Marts IP (34.38.103.182). If you attempt to connect from your own workstation or any other unlisted IP, access will be denied.
Solution:
Using a dedicated service account limits access to requests originating only from OWOX Data Marts. However, if you need to log in to the Snowflake interface using this dedicated account (for example, to verify settings), you must ask your Snowflake administrator to temporarily update the network policy to include your current workstation’s IP address alongside the OWOX Data Marts IP.
Refer to Step 2: Configure Network Policy (Admin Action Required) for instructions on modifying the allowed IP list.
After the policy is updated, retry the connection.