
AWS Redshift
Use this guide to configure AWS Redshift as a storage in OWOX Data Marts. The steps below walk you through creating a storage record, completing authentication, and finishing validation.
1. Go to the Storages Page and choose Storage Type
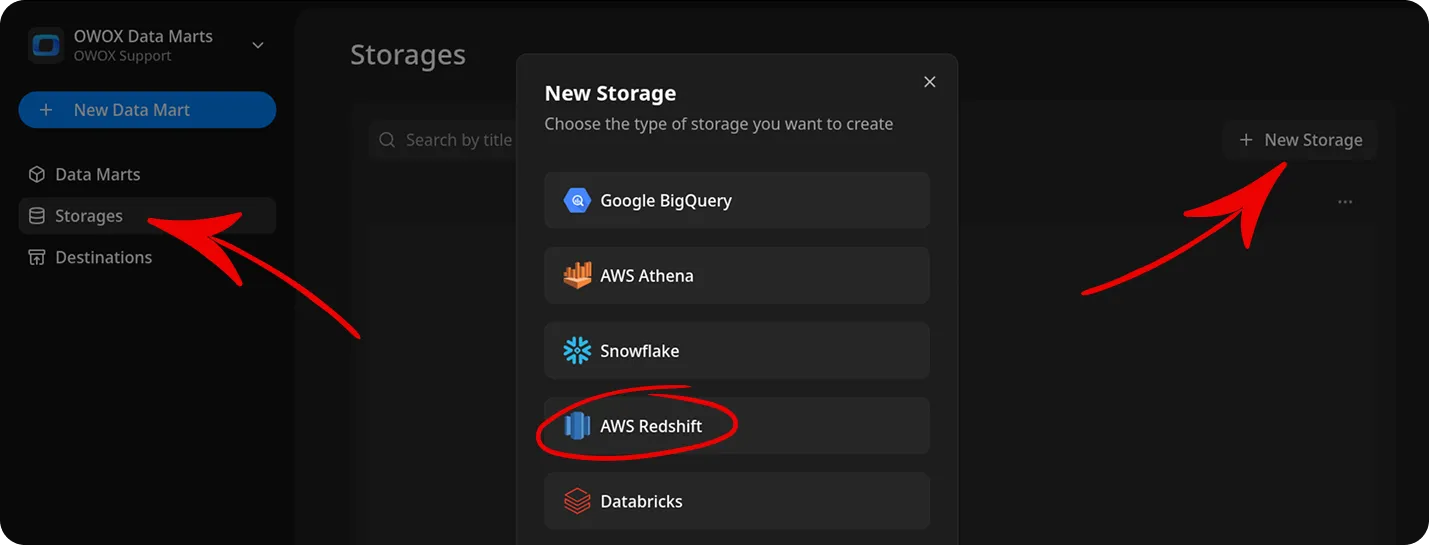
Section titled “1. Go to the Storages Page and choose Storage Type”In the OWOX Data Marts web application, navigate to Storages from the main navigation pane and click + New Storage. Click AWS Redshift to create a new Storage configuration.
Upon selecting the + New Storage button and specifying the desired storage type, a Storage entry is created. You can create Data Mart entities and model a data structure for your project prior to configuring the Storage. Note that Data Mart cannot be validated or published until the associated Storage is fully configured.
2. Add title and AWS region
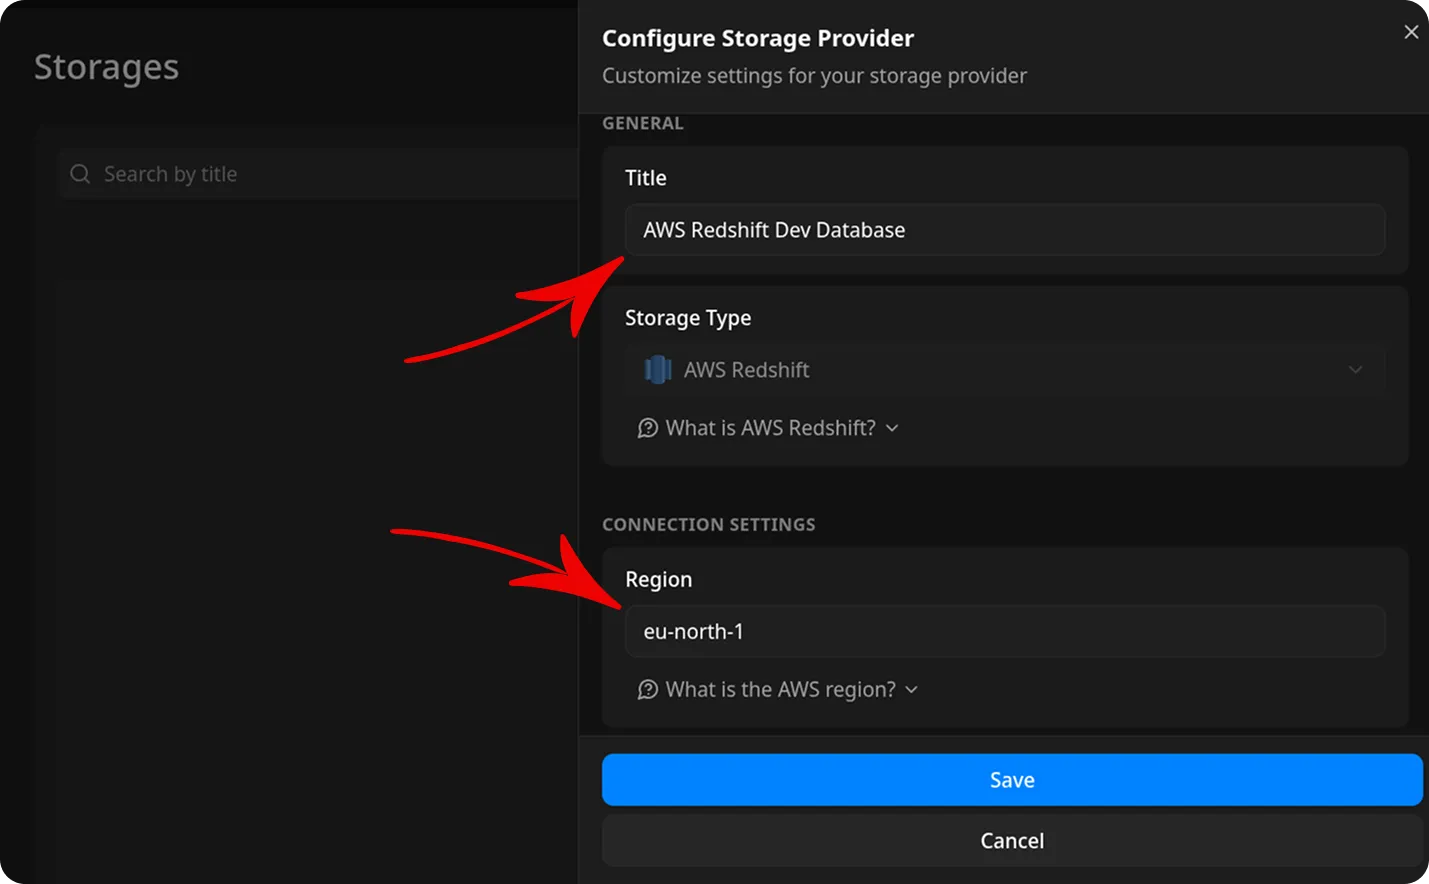
Section titled “2. Add title and AWS region”Give the storage configuration a clear title, for example: AWS Redshift Dev Database.
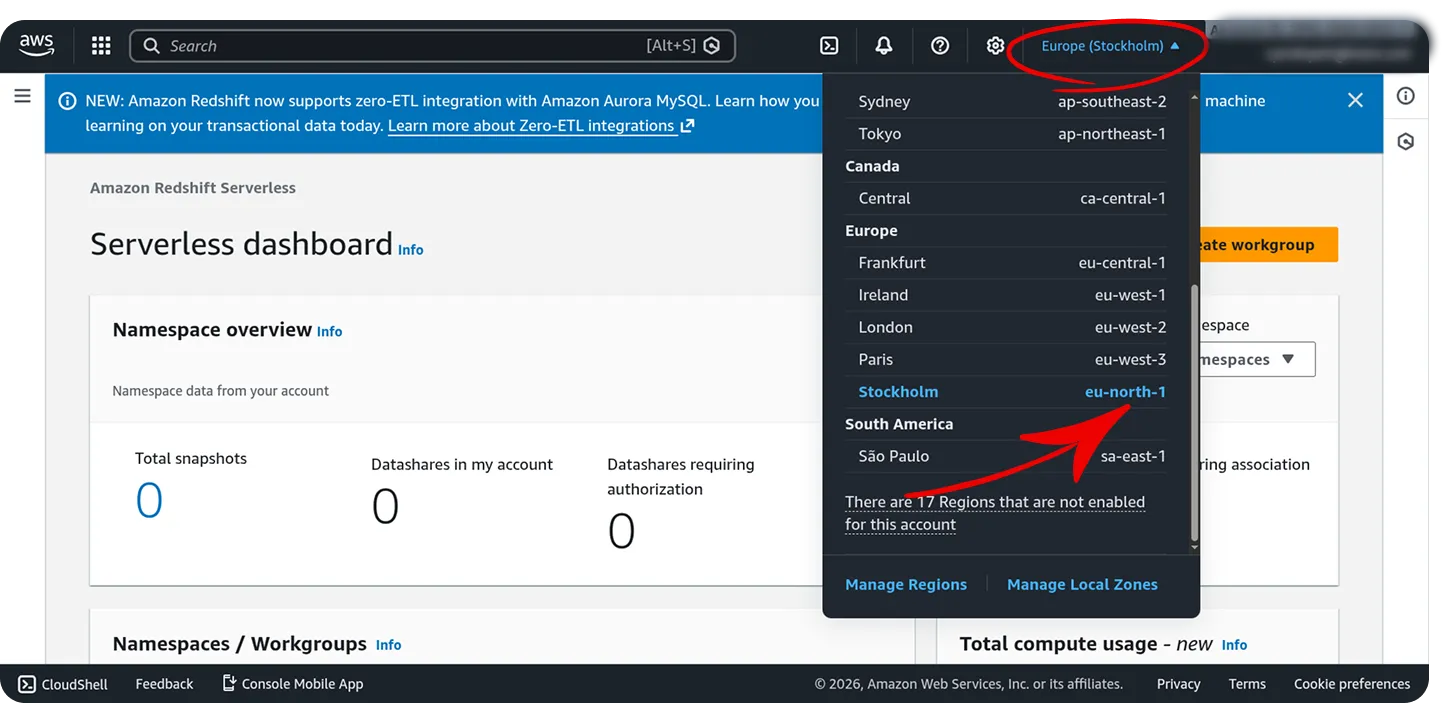
Choose the AWS region where your Redshift cluster or workgroup is located:
- Examples:
us-east-1,eu-west-1,ap-southeast-1 - You can find your region in the AWS Redshift Console in the top right corner or url.
Choose Connection Type
Section titled “Choose Connection Type”AWS Redshift supports two deployment types (one is required). It’s based on your use case and pricing model.
Option 1: Serverless
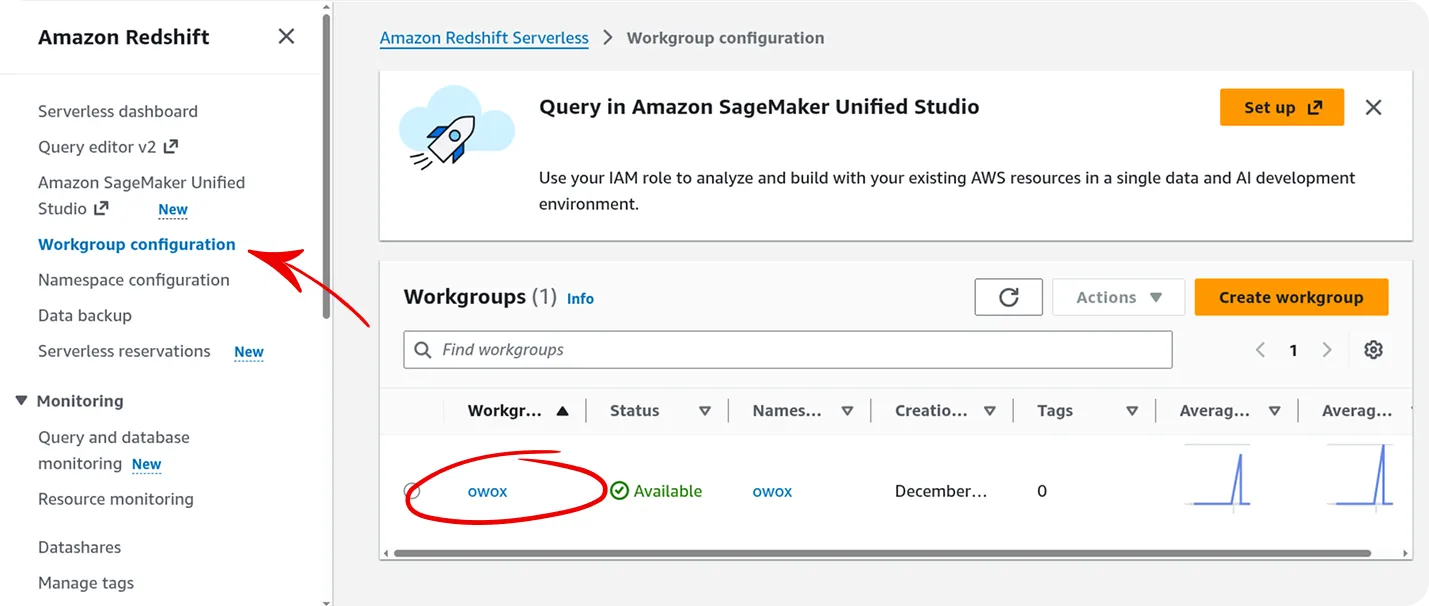
Section titled “Option 1: Serverless”Workgroup Name:
- Go to AWS Redshift Serverless Console
- Navigate to Workgroup configuration
- Copy the workgroup name (e.g.,
defaultormy-workgroup)
Option 2: Provisioned
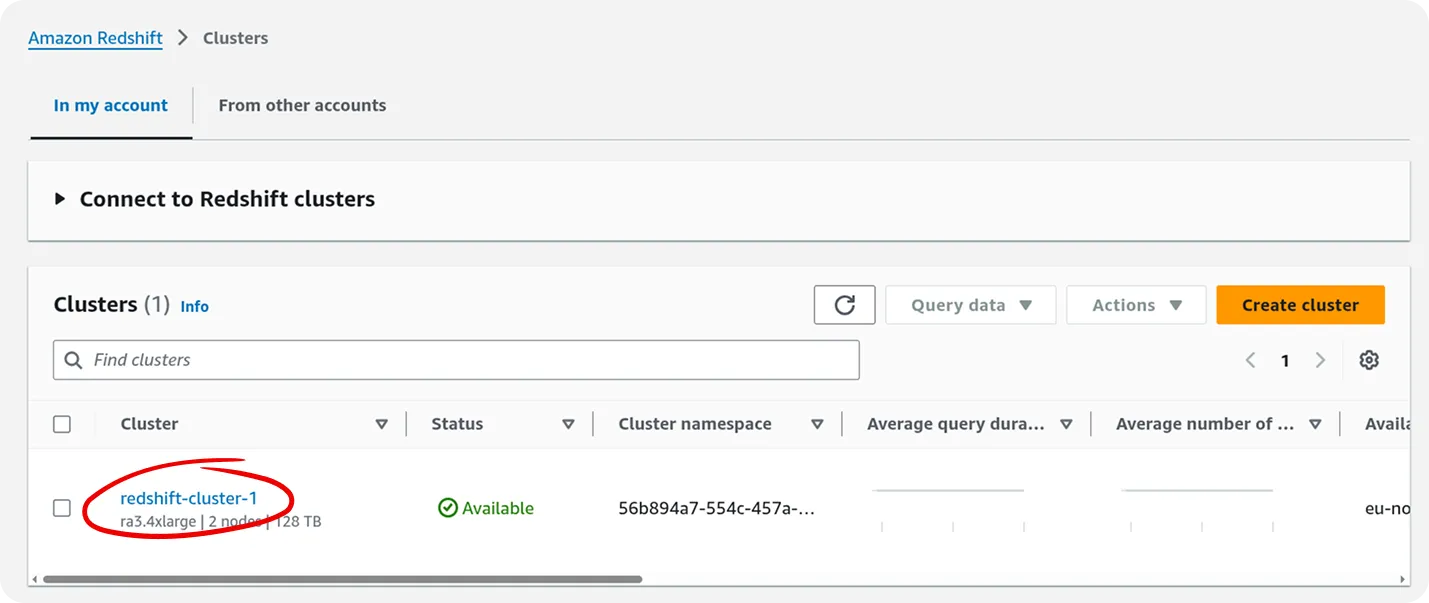
Section titled “Option 2: Provisioned”Cluster Identifier:
- Go to AWS Redshift Provisioned Clusters
- Find your cluster in the list
- Copy the Cluster identifier (e.g.,
redshift-cluster-1)
Enter Database Name
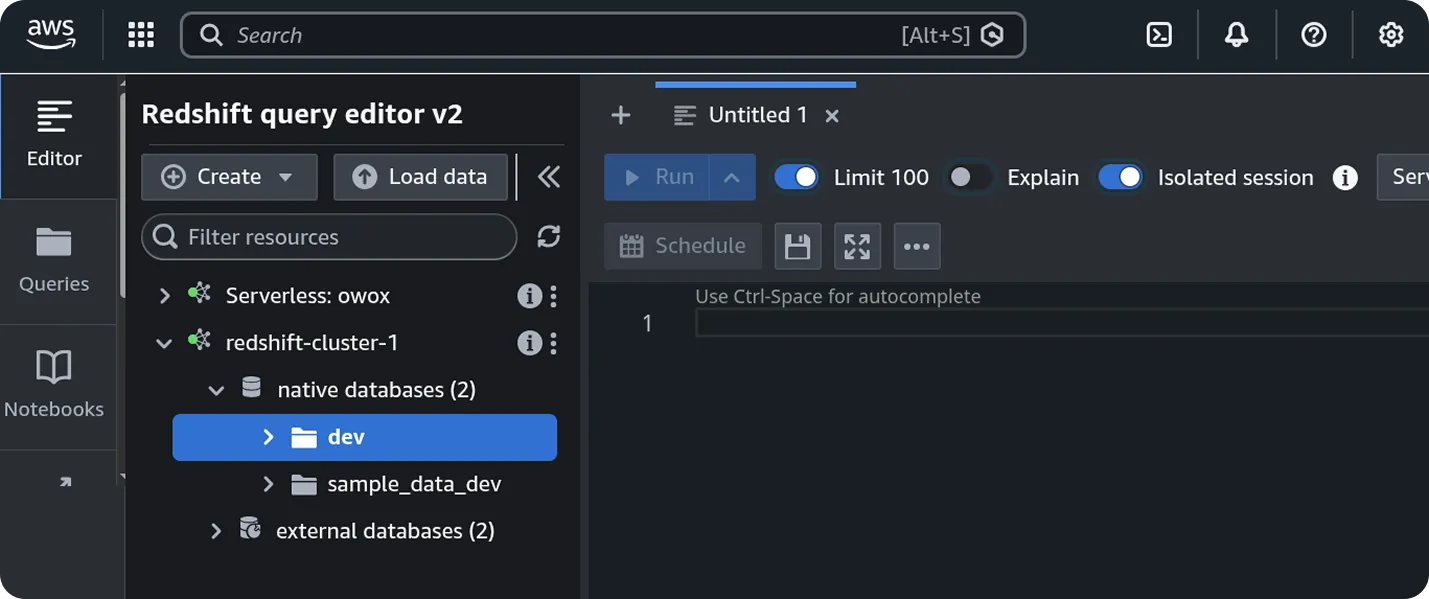
Section titled “Enter Database Name”- This is the name of the database within your Redshift cluster
- Default Redshift database is typically
devordefaultdb - You can find this in the AWS Redshift Query Editor
Authentication
Section titled “Authentication”OWOX Data Marts uses AWS IAM credentials to authenticate with Redshift Data API.
Access Key ID and Secret Access Key
Section titled “Access Key ID and Secret Access Key”How to create IAM credentials:
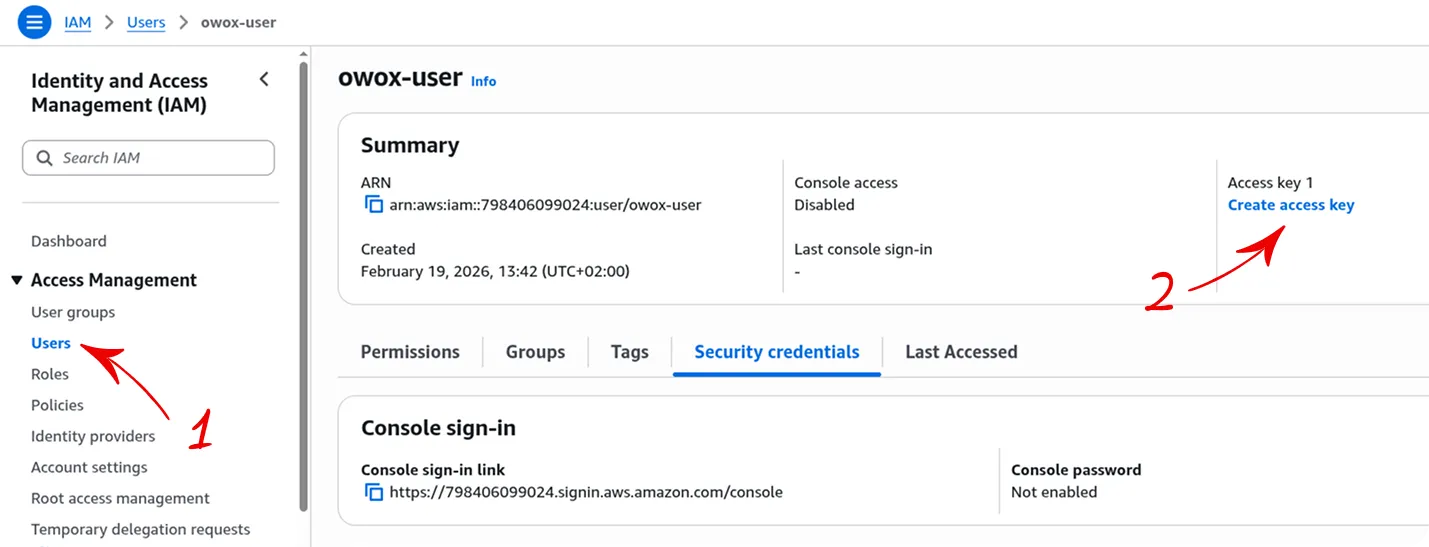
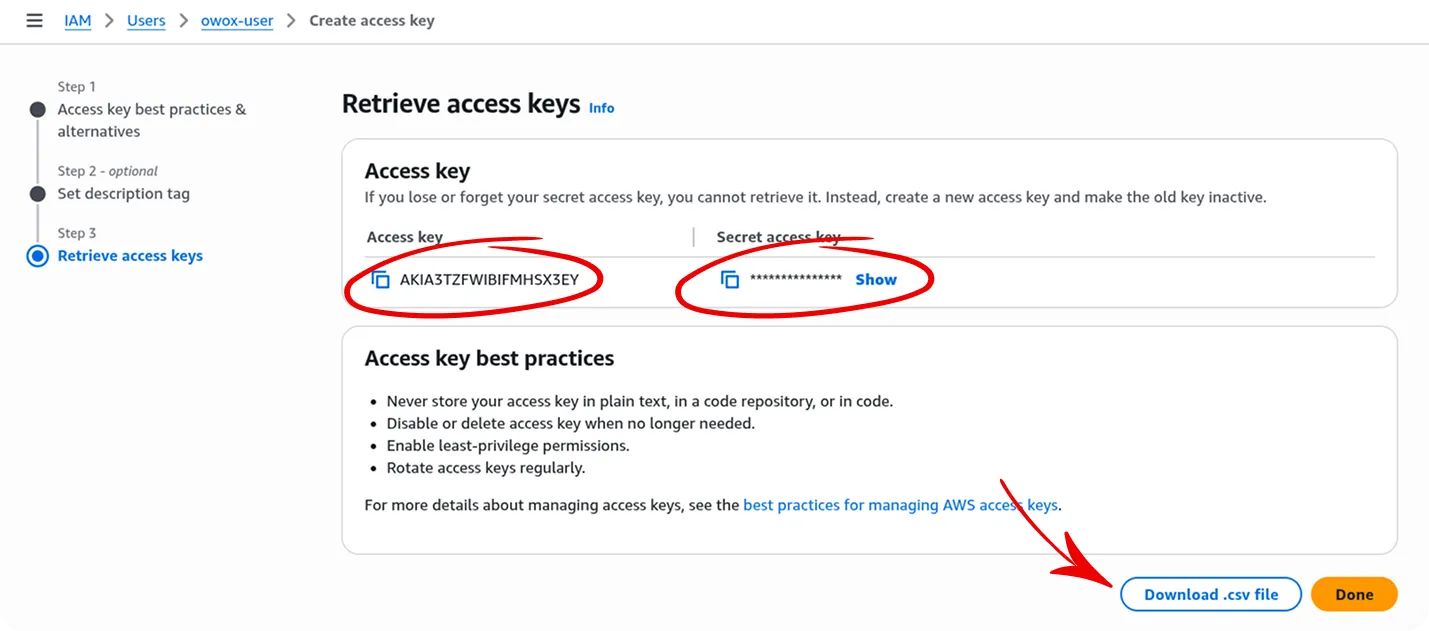
- Go to AWS IAM Console
- Navigate to Users → Select your user or create a new one
- Click Create access key
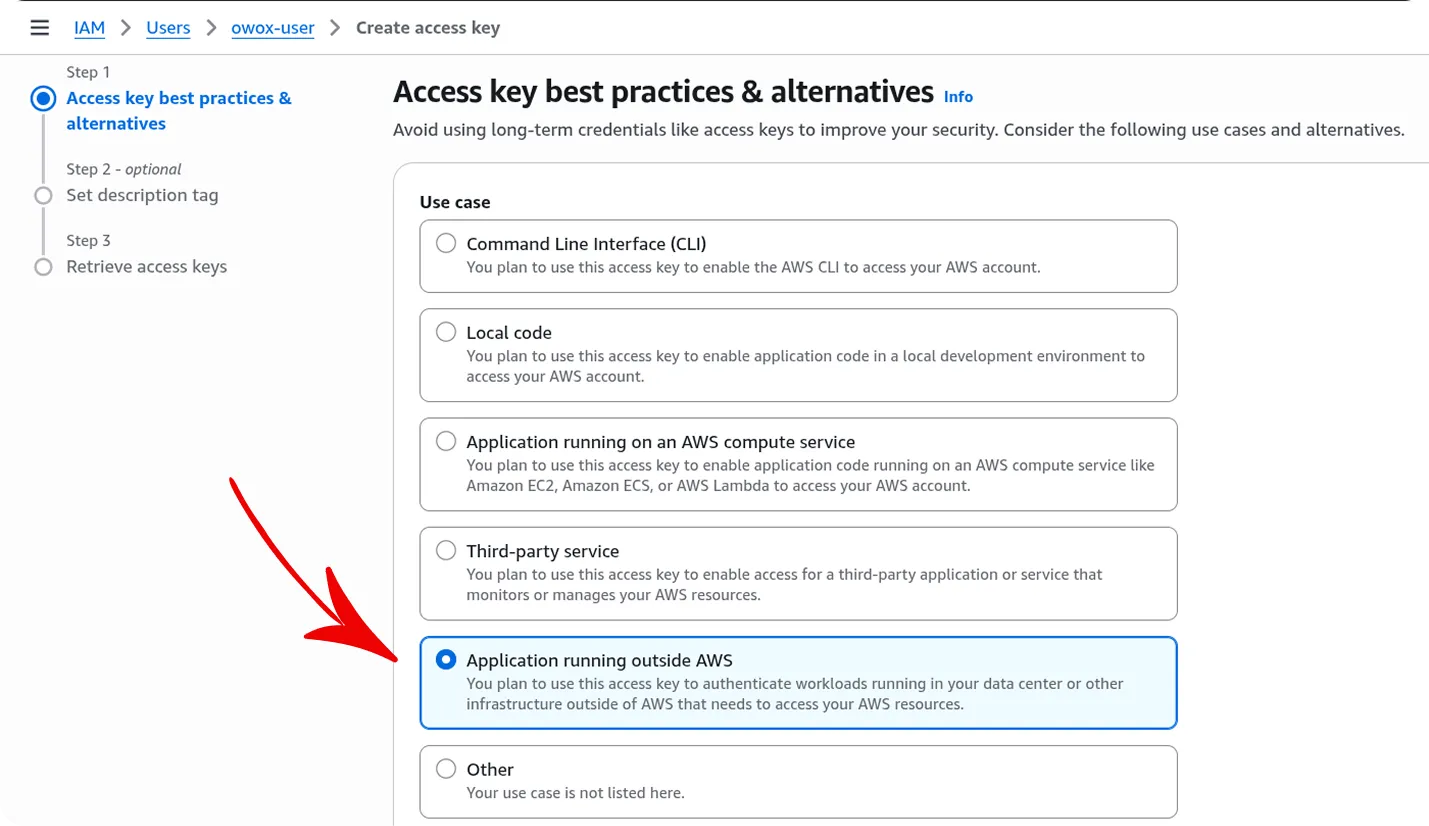
- Choose Application running outside AWS
- Copy the Access key and Secret access key or download .csv file with access keys.
Security Best Practice:
- Never share your secret access key
- Store it securely (use AWS Secrets Manager or similar)
- Rotate keys regularly
- Use IAM policies to grant minimum required permissions
Required IAM Permissions
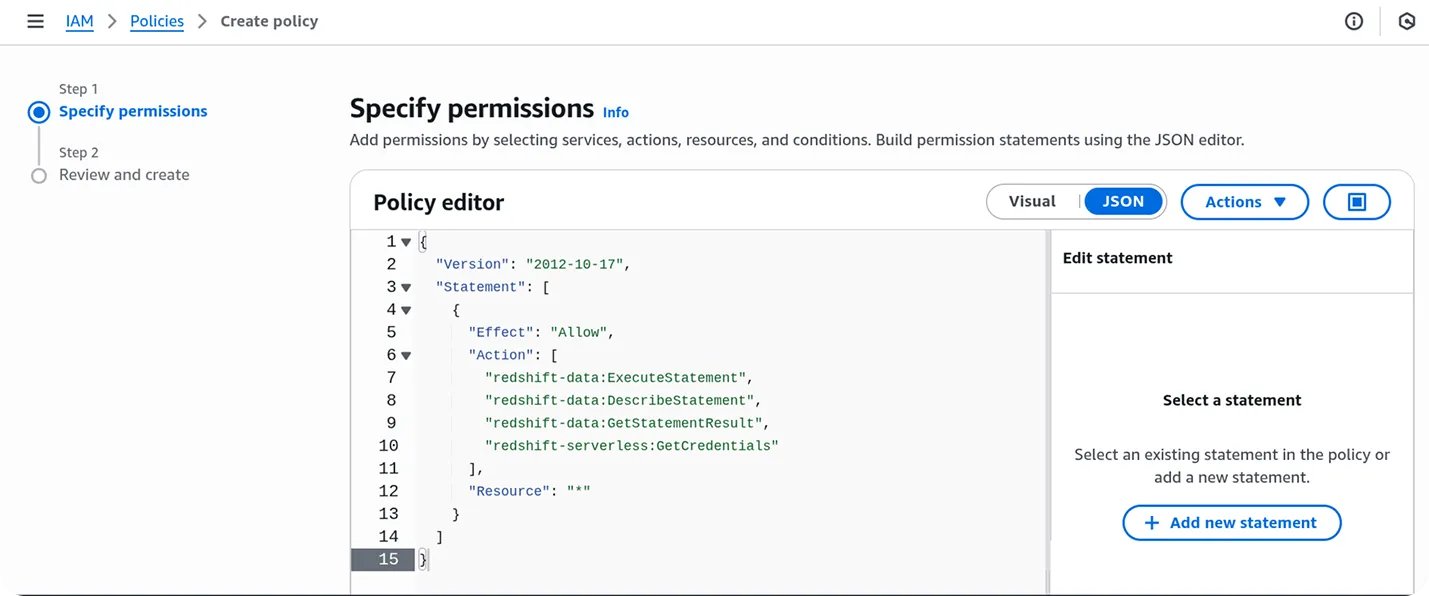
Section titled “Required IAM Permissions”Your IAM user or role needs the following permissions:
For Serverless:
{ "Version": "2012-10-17", "Statement": [ { "Effect": "Allow", "Action": [ "redshift-data:ExecuteStatement", "redshift-data:DescribeStatement", "redshift-data:GetStatementResult", "redshift-serverless:GetCredentials" ], "Resource": "*" } ]}For Provisioned Cluster:
{ "Version": "2012-10-17", "Statement": [ { "Effect": "Allow", "Action": [ "redshift-data:ExecuteStatement", "redshift-data:DescribeStatement", "redshift-data:GetStatementResult", "redshift:GetClusterCredentials" ], "Resource": "*" } ]}Tip: You can attach the AWS managed policy
AmazonRedshiftDataFullAccessfor quick setup, but consider using a custom policy with minimal permissions for production. You can set permissions to certain database and tables for more security. Example:"Resource": "arn:aws:redshift:us-east-1:123456789012"
3. Grand Permissions to create schemas in database
Section titled “3. Grand Permissions to create schemas in database”If you want to create schemas in your database (to upload data from a connector-based data mart), you need to grant permissions to the IAM user who will upload the data.
GRANT CREATE ON DATABASE dev TO "IAM:<USERNAME_IN_IAM>";Tip: You can find your username in IAM in the AWS IAM Console in the Users tab.
4. Finalize Setup
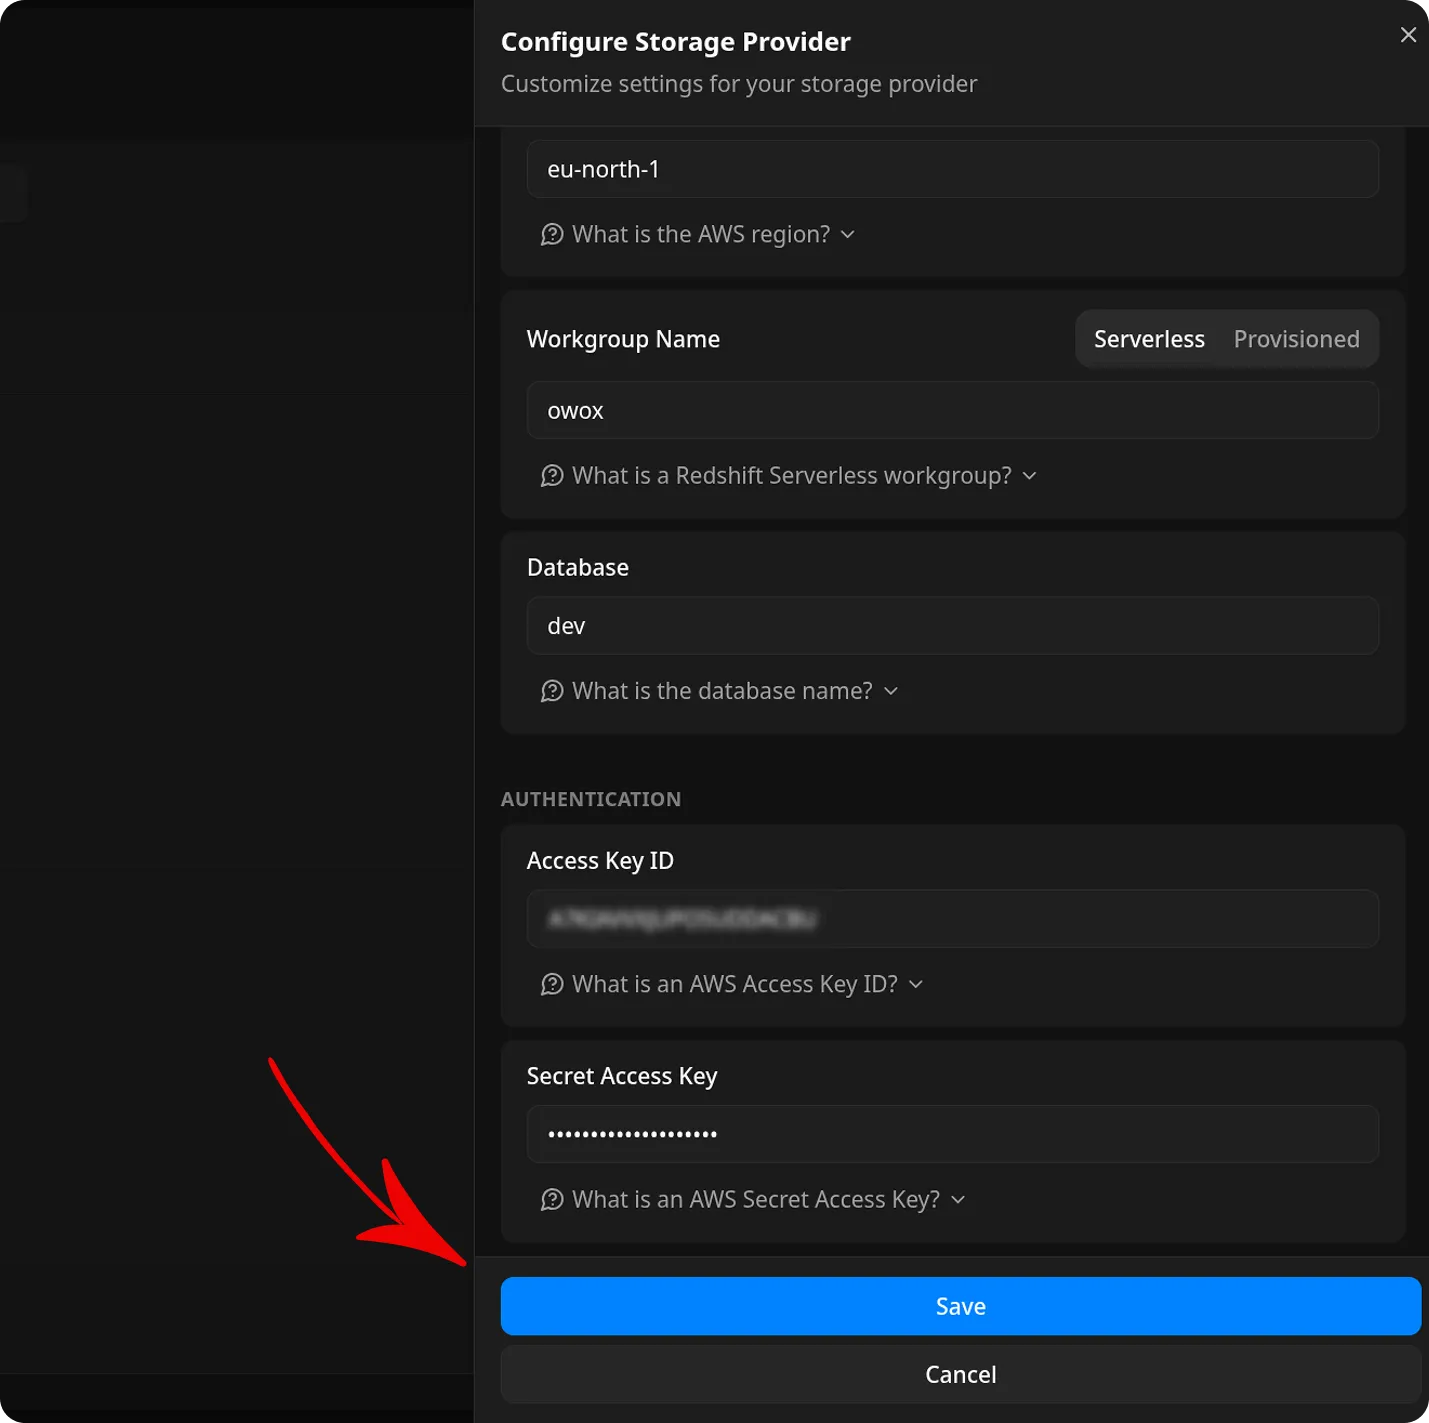
Section titled “4. Finalize Setup”Review your entries and click Save to add the Storage configuration, or Cancel to exit without saving.
Once saved, OWOX Data Marts will validate the connection to ensure all credentials are correct.
Next Steps
Section titled “Next Steps”After configuring your AWS Redshift storage:
- Create a Data Mart that uses this storage
- Define your data structure with Redshift-specific field types
- Configure a Connector to load data into Redshift
- Run reports and export data from your Redshift tables
Troubleshooting
Section titled “Troubleshooting”Connection Failed
Section titled “Connection Failed”- Verify your AWS region is correct
- Ensure the database name exists in your Redshift cluster/workgroup
- Check that workgroup name or cluster identifier is spelled correctly
- Verify your Access Key ID and Secret Access Key are correct
Permission Denied
Section titled “Permission Denied”Make sure your IAM user has the required permissions listed above. You can test permissions by running:
aws redshift-data execute-statement \ --region us-east-1 \ --database dev \ --workgroup-name my-workgroup \ --sql "SELECT 1"“Schema does not exist” Error
Section titled ““Schema does not exist” Error”- Schema is now configured in the Connector setup (Step 5), not in Storage
- Make sure you’ve entered a schema name when creating the connector
- The schema will be automatically created if it doesn’t exist
Query Timeout
Section titled “Query Timeout”- Redshift Data API has a 5-minute query timeout
- For large data loads, consider breaking them into smaller batches
- Check your warehouse/cluster size and scaling settings
Access Denied to Database
Section titled “Access Denied to Database”Ensure your Redshift database allows access from the IAM credentials:
For Serverless:
GRANT ALL ON DATABASE dev TO "IAM:<USERNAME_IN_IAM>";For Provisioned:
GRANT ALL ON DATABASE dev TO "IAM:<USERNAME_IN_IAM>";Filter values and standard_conforming_strings
Section titled “Filter values and standard_conforming_strings”OWOX Data Marts safely escapes report filter values for Redshift by relying on the
default standard_conforming_strings = on setting (a backslash is treated as an
ordinary character). This is the default for both Redshift Serverless and provisioned
clusters. Do not set standard_conforming_strings = off for the database OWOX connects to.